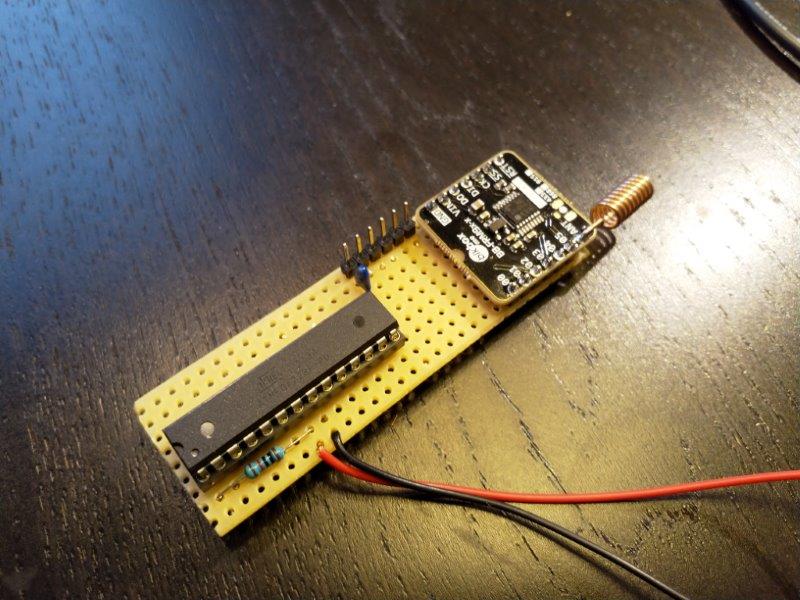
If you want to try out a Cheap and Easy arduino sensor you can find a BB-FRM9x-x on ebay and a atmel328p-pu.
My focus was to find a cheap, easy to program and low current solution for everyone ...
The BB-FRM9x-x do have a voltage regulator so it means that you can supply with 3.6 volts to 5 volts.
I can get it down to 13uA with 3.6 Volts in sleep mode.
links Ebay Blk-Box and 328p-pu with socket
you will also need a piece of veroboard.

The schematic is simpel, and it is easy to wire on the backsite of the veroboard.
you will need to burn the 8 mhz bootloader on the atmega328p - you will save current and components.
Find the instructions here Arduino 8 mhz bootloader
On my version i did put a connector and a 0.1uf cap so i could program with serial adaptor. You can take your 328 chip and program it in the arduino borad and then move it to your breadboard.
now it is time for getting arduino libraries great LMIC library
The footprint of the library is small and when compiling underneath code it says "Sketch uses 20630 bytes (67%) of program storage space. Maximum is 30720 bytes." , so you have room to talk to some simple sensors.
my code looks like
/*
* This code is a copy and a futher development
* from https://github.com/matthijskooijman/arduino-lmic
* a great guy which did a wonderfull job
* I did put on the powerdown etc
* have fun Hjalmar Skovholm Hansen
*/
#include <lmic.h>
#include <hal/hal.h>
#include <SPI.h>
#include "LowPower.h"
// keys from TheThingsNetwork
// I do use ABP so have to put them in manually
// this because of LowPower
// update will come later when found a solution ;o)
static const PROGMEM u1_t NWKSKEY[16] = { 0x18, 0x21, 0xAF, 0xB4, 0x05, 0x2A, 0x10, 0x40, 0xE9, 0xE3, 0x54, 0xC0, 0xAF, 0xE9, 0x40, 0xE3 };
static const u1_t PROGMEM APPSKEY[16] = { 0xBE, 0xAA, 0x1B, 0xAB, 0xDF, 0x97, 0xD1, 0x08, 0xDF, 0xBD, 0x6B, 0x42, 0x61, 0x8E, 0xE4, 0x6E };
static const u4_t DEVADDR = 0x26011450 ;
void os_getArtEui (u1_t* buf) { }
void os_getDevEui (u1_t* buf) { }
void os_getDevKey (u1_t* buf) { }
// Our array to put data into
// The Things Network suggest max 10 byte
static uint8_t mydata[] = {0x00,0x01,0x02,0x03,0x04,0x05,0x06,0x07,0x08,0x09};
static osjob_t sendjob;
const lmic_pinmap lmic_pins = {
.nss = 6, // Digital pin connected to SS
.rxtx = LMIC_UNUSED_PIN, // we do not use these
.rst = 5, // Digital pin connected to RST
.dio = {2, 3, 4}, // Digital pin connected to 00,01,02
};
void onEvent (ev_t ev) {
Serial.print(os_getTime());
Serial.print(": ");
switch(ev) {
case EV_SCAN_TIMEOUT:
Serial.println(F("EV_SCAN_TIMEOUT"));
break;
case EV_BEACON_FOUND:
Serial.println(F("EV_BEACON_FOUND"));
break;
case EV_BEACON_MISSED:
Serial.println(F("EV_BEACON_MISSED"));
break;
case EV_BEACON_TRACKED:
Serial.println(F("EV_BEACON_TRACKED"));
break;
case EV_JOINING:
Serial.println(F("EV_JOINING"));
break;
case EV_JOINED:
Serial.println(F("EV_JOINED"));
break;
case EV_RFU1:
Serial.println(F("EV_RFU1"));
break;
case EV_JOIN_FAILED:
Serial.println(F("EV_JOIN_FAILED"));
break;
case EV_REJOIN_FAILED:
Serial.println(F("EV_REJOIN_FAILED"));
break;
break;
case EV_TXCOMPLETE:
Serial.println(F("EV_TXCOMPLETE (includes waiting for RX windows)"));
if (LMIC.txrxFlags & TXRX_ACK)
Serial.println(F("Received ack"));
if(LMIC.dataLen) {
// data received in rx slot after tx
Serial.print(F("Data Received: "));
Serial.write(LMIC.frame+LMIC.dataBeg, LMIC.dataLen);
Serial.println();
}
// Here we go to sleep ...
// watchdog can go max 8 sec
// so we make a loop 8 times 10 equal 80 sec between
// each time we do connetc to gateway
// think this only work for ABP
for (int i=0; i<=9; i++) {
LowPower.powerDown(SLEEP_8S, ADC_OFF, BOD_OFF);
}
do_send(&sendjob);
break;
case EV_LOST_TSYNC:
Serial.println(F("EV_LOST_TSYNC"));
break;
case EV_RESET:
Serial.println(F("EV_RESET"));
break;
case EV_RXCOMPLETE:
// data received in ping slot
Serial.println(F("EV_RXCOMPLETE"));
break;
case EV_LINK_DEAD:
Serial.println(F("EV_LINK_DEAD"));
break;
case EV_LINK_ALIVE:
Serial.println(F("EV_LINK_ALIVE"));
break;
default:
Serial.println(F("Unknown event"));
break;
}
}
void do_send(osjob_t* j){
// Check if there is not a current TX/RX job running
if (LMIC.opmode & OP_TXRXPEND) {
Serial.println(F("OP_TXRXPEND, not sending"));
} else {
LMIC_setTxData2(1, mydata, sizeof(mydata), 0);
Serial.println(F("Packet queued"));
}
}
void setup() {
Serial.begin(115200);
Serial.println(F("Starting"));
os_init();
LMIC_reset();
#ifdef PROGMEM
uint8_t appskey[sizeof(APPSKEY)];
uint8_t nwkskey[sizeof(NWKSKEY)];
memcpy_P(appskey, APPSKEY, sizeof(APPSKEY));
memcpy_P(nwkskey, NWKSKEY, sizeof(NWKSKEY));
LMIC_setSession (0x1, DEVADDR, nwkskey, appskey);
#else
LMIC_setSession (0x1, DEVADDR, NWKSKEY, APPSKEY);
#endif
LMIC_setupChannel(0, 868100000, DR_RANGE_MAP(DR_SF12, DR_SF7), BAND_CENTI); // g-band
LMIC_setupChannel(1, 868300000, DR_RANGE_MAP(DR_SF12, DR_SF7B), BAND_CENTI); // g-band
LMIC_setupChannel(2, 868500000, DR_RANGE_MAP(DR_SF12, DR_SF7), BAND_CENTI); // g-band
LMIC_setupChannel(3, 867100000, DR_RANGE_MAP(DR_SF12, DR_SF7), BAND_CENTI); // g-band
LMIC_setupChannel(4, 867300000, DR_RANGE_MAP(DR_SF12, DR_SF7), BAND_CENTI); // g-band
LMIC_setupChannel(5, 867500000, DR_RANGE_MAP(DR_SF12, DR_SF7), BAND_CENTI); // g-band
LMIC_setupChannel(6, 867700000, DR_RANGE_MAP(DR_SF12, DR_SF7), BAND_CENTI); // g-band
LMIC_setupChannel(7, 867900000, DR_RANGE_MAP(DR_SF12, DR_SF7), BAND_CENTI); // g-band
LMIC_setupChannel(8, 868800000, DR_RANGE_MAP(DR_FSK, DR_FSK), BAND_MILLI); // g2-band
LMIC_setLinkCheckMode(0);
LMIC_setDrTxpow(DR_SF7, 14); // SF7 and max power from module = 14
do_send(&sendjob);
}
void loop() {
os_runloop_once(); // start your loop with calling LoRa statemachine
// From here you can read your sensors
// and update mydata array with results
// I just update for fun to have some data
// know overrun etc ..but just to see results
mydata[0]= mydata[0] + 0x01;
mydata[5]= mydata[5] + 0x01;
}
I do power with 3 * 1.5 V AA cells in serial = 4.5 volts. Link to ebay
The current consumsion i measure to 13uA in sleep mode and 13 mA in sendning mode but that only 60 mS ;o)
Enjoy with this Cheap and Easy LoRa sensor.
- Log in to post comments